+1 (409) 800-6601
 contact@virtualbuildingstudio.com

MEP subcontractors’ price a job based on what they think they are getting in the model. The problem happens when the model they open is nothing like that expectation. The BIM Execution Plan says "LOD 300" and the general contractor wants shop output. Then the subcontractor pays for each detailing hour that comes in between.
Most of these problems come down to three numbers in the contract that contractors use. Those numbers are how they protect their margins before they even sign. They understand the difference between LOD 300 LOD 350 and LOD 400. At each level the line, between what engineering does and what the contractor does changes.
That split works if everyone interprets the definitions the same way. Otherwise, confusion starts.
What Do LOD 300, LOD 350, and LOD 400 Mean in MEP BIM?
LOD means Levels of Development. It tells the project team how much they can trust a model element. It doesn’t matter how slick the model looks on screen. The Level of Development in MEP BIM gives an answer to a single question, for every trade. Can crew build from this duct, pipe or tray?
Here is what each of the three levels means in terms:
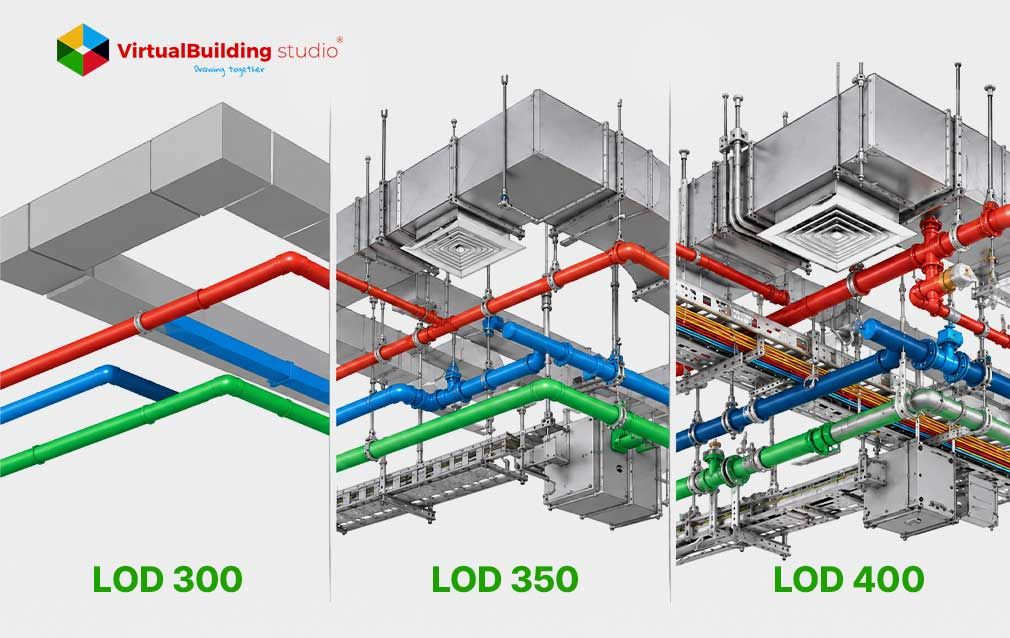
- LOD 300 (Design Intent):Engineers model each system to be the right size, shape, location, and orientation. The model proves the design works on paper, and engineers stop there. Nobody expects it to guide a crew yet.
- LOD 350 (Coordination): Modelers add the parts that touch other trades. That means insulation, hangers, supports, sleeves, and structural connections. This is the level where trades start talking to each other through the model.
- LOD 400 (Fabrication): Detailers model each element with enough detail for a shop to build and install it. Real manufacturer parts and exact lengths replace generic shapes. This is the version a fabrication shop can actually trust.
Most US teams follow the BIMForum LOD Specification, which BIM Forum built on the original AIA definitions. The spec sets the language, but contractors feel each jump between levels in their labor budget.
LOD 300 vs 350 vs 400: Key Differences
All three definitions have something in common: each level answers a different question about the same system. At LOD 300, the question is whether the system works. At LOD 350, the question is whether it fits. At LOD 400, the question is whether a shop can build it.
Many GCs and owners assume a detailed-looking model is ready for fabrication. Contractors who accept that assumption end up pricing work that nobody has modeled yet.
A 6-inch chilled water pipe shows how each level changes the same element:
- At LOD 300, the engineer draws a plain 6-inch cylinder with generic isolation valves. Nobody models insulation, flanges, or real fitting sizes.
- At LOD 350, the modeler sets the pipe at its true outside diameter of 6.625 inches. They add 2 inches of insulation, clevis hangers to the deck, and slab sleeves.
- At LOD 400, the detailer cuts the run into 21-foot shop sections with real grooved couplings. Each assembly then gets a spool tag for the shop floor.
Coordinators resolve most cross-trade clashes in the move from LOD 300 to LOD 350. Teams that skip that step tend to find their clashes in the field instead.
Here is how the MEP BIM LOD levels compare side by side, from early planning to handover:
The table covers the theory. The real test is what a contractor opens on day one at each stage.
What Contractors Receive at Each MEP BIM Level
That day-one handoff is where the money questions start.Among the most dangerous terms in subcontracts is the phrase "BIM coordination according to LOD 300/400." General contractors demand the LOD 400 result, and the model sent to them is LOD 300. The subcontractor bears the cost of this discrepancy.
Bad handoffs like this add up across the industry. An FMI study with PlanGrid found poor project data and miscommunication cause 48% of US rework.FMI estimated that rework at $31.3 billion a year.
Closing the gap between LOD 300 and LOD 400 is not a software button. Skilled detailers redraw the systems by hand with real manufacturer content. Here is what each handoff actually contains.
LOD 300: Design Intent and System Layouts
LOD 300 is the first handoff most subcontractors see from the engineer’s model. Engineers construct it to demonstrate that the system satisfies code and performance objectives. They do not build it to guide installation. In practice, the contractor receives:
- Generic equipment footprints
- Single-line or basic double-line piping at nominal sizes
- Placeholder valves and fittings
- Routing that assumes clean 90-degree turns
Nominal sizes ignore real material differences. A 4-inch copper line and a 4-inch steel line look the same here, though their outside diameters differ. Contractors cannot buy material or prefabricate from this model without major rework.
Smart subcontractors’ price that rework before they bid, not after. Many bring in full spectrum MEP BIM services early so the detailing cost shows up in the number. That missing physical detail is exactly what the next level fills in.
LOD 350: Coordination and Interface Details
Contractors start seeing real constructability once the team pushes the model to LOD 350. At this level, modelers show the full space each system takes up. A pipe with 2-inch insulation now claims its true footprint. Coordinators can then catch soft clashes on screen instead of in the ceiling.
The contractor also receives the interfaces between trades:
- True outside diameters plus insulation
- Hanger attachments mapped to the structural grid
- Wall and slab sleeves for every penetration
- Clearance zones for maintenance access
Those interfaces are the most important ones where ceilings get packed. Corridors, mechanical rooms, shafts, trades competing for the same few inches. This is the level where the coordinators make sure that the trays, ducts and sprinkler lines all fit.
Fitting inside the building, though, is a different job from getting built in a shop.
LOD 400: Fabrication and Installation Details
Shops need more than a model that fits. At LOD 400, detailers hand them a model they can cut, assemble, and ship. The LOD 400 fabrication deliverables a contractor receives include:
- Manufacturer-specific fabrication parts (ITM content) instead of generic Revit families
- Pipe cut lengths that account for weld gaps, couplings, and thread allowances
- Spool maps, bolt sets, and part tags
- Assembly weights for planning lifts
Each item on that list removes a guess from the shop floor. Fewer guesses mean fewer recut pieces and less scrap in the dumpster.
Detailers then turn this model into the shop drawings crews follow at the bench. Contractors without in-house detailers can bring in MEP spool drawings services for this stage. This level lets contractors move a large share of labor off the jobsite and into the shop.
That shift raises a fair question: which level should your project actually ask for?
How to Choose the Right LOD for Your MEP Project
The only time moving labor into the shop pays off is when the contract demands the right level. The math of prefabrication tells you why asking higher can pay.
Field labor is the most costly and least controllable line on any job. A fitter working on a ladder works a hell of a lot slower than a welder at a shop bench.
Shop crews also work in steady light, at a steady height, with the right tools at hand. They are much less susceptible to the weather, other trades, and missing material. Contractors get more predictable hours, and predictable hours are easier to bid on.
This is supported by survey data. In a Dodge Data & Analytics study, about 90 percent of prefab users reported better productivity, quality, and schedule certainty. They were comparing stick built versus prefab construction.
Seen this way, the upfront spend on LOD 400 fabrication deliverables is small next to the field hours it saves. Not every project needs that spend, though.
Every MEP BIM Level of Development comes at a different price tag. The right choice will depend on the delivery method and who pays for the detailing:
- Design-Bid-Build projects: Engineers only go to LOD 300. The successful subcontractor will bear the cost of achieving LOD 400. That should be in the bid, not a change of order.
- GCs focused on coordination: Ask for LOD 350. It confirms every system fits without paying for shop-level detail. It also gives every trade the same spatial picture.
- Subcontractors chasing prefab margins: Plan for LOD 400, either in-house or through MEP BIM modeling services.
Choosing the right level still only works if everyone reads it the same way.
Common LOD Misunderstandings and Contractor Checklist
Most LOD mix-ups follow a familiar pattern. The biggest one is treating visual detail as a higher LOD. A contractor gains nothing from a chiller rendered down to its bolts if nobody modeled the tube-pull clearance. That clearance zone is an LOD 350 requirement, and missing it means a fix in the field.
A few other misunderstandings come up on almost every bid:
- Reading "LOD 300/400" as one scope. It is two scopes with very different costs.
- Assuming the design model includes hangers and seismic bracing. At LOD 300, it does not.
- Starting LOD 400 work before submittals are approved. Teams using MEP spool drawings services need final manufacturer data first.
Before you price any MEP BIM scope, run through these pre-bid questions:
- Does the BEP separate the LOD at design handover from the LOD at construction?
- Who pays to model hangers and seismic bracing at LOD 350?
- If you owe LOD 400, are manufacturer submittals approved so detailers can build fabrication parts?
- Does the clash matrix include insulation?
- Which MEP BIM LOD levels will the GC accept as complete for each trade?
Clear answers to these questions turn a risky bid into a priced one.
Conclusion
All of the questions contained in the checklist are all revolving around the same principle. Transitioning from LOD 300 to LOD 350 and then LOD 400 is what transforms a project from engineering theory to an actual thing a construction crew can construct. Contractors aware of what is being covered at various stages are bidding with no surprises. They also seek clear wording in the BEP. Properly defining the levels of development on paper costs less than fixing it on site. Proper scoping of the gap in detail allows for cutting down on rework on the construction site and makes prefabrication cost effective.
MEP BIM modeling services fill the gap for companies without the required detailing personnel. A quick examination through the MEP BIM accuracy guide catches everything that was missed before a model enters the workshop. Contractors who want to cover the whole journey use MEP BIM services starting from coordination up to spooling.

Don’t Bid Blind. Send Us Your BEP and Know Your Real LOD Before You Sign